
elevne's Study Note
React Native 로 To-Do App 만들기 (4) 본문
이번에는 Firebase 와 App 을 연결하여 로그인 및 회원가입 기능을 구현해보았다. 우선 firebase 홈페이지에서 간단한 절차를 통해 프로젝트를 생성해주는 과정을 거쳤다. (홈페이지 UI 를 따라가면 쉽게 생성할 수 있다) 그 후 프로젝트 내에 firebase 를 설치해주어야 했다.
npm install firebase
그 다음으로 프로젝트 내에 firebase.js 라는 파일을 생성해준 다음, firebase 홈페이지에서 제공해주는 정보를 바탕으로 코드를 입력해주었다.
// Import the functions you need from the SDKs you need
import { initializeApp } from "firebase/app";
// TODO: Add SDKs for Firebase products that you want to use
// https://firebase.google.com/docs/web/setup#available-libraries
import "firebase/auth";

// Your web app's Firebase configuration
const firebaseConfig = {
  apiKey: "AIzaSyClVe2UoWpuT4WC13C8hBNBtmRNsrnJQnk",
  authDomain: "rn-todo-25f54.firebaseapp.com",
  projectId: "rn-todo-25f54",
  storageBucket: "rn-todo-25f54.appspot.com",
  messagingSenderId: "270274868568",
  appId: "1:270274868568:web:417508ee1062d152c6612d"
};

// Initialize Firebase
const app = initializeApp(firebaseConfig);

export default app;
그 다음으로는, 우선 firebase 를 이용한 회원가입 기능부터 구현해보고자 하였다. 이 때는 "firebase/auth" 에서 제공하는 createUserWithEmailAndPassword 메서드가 사용된다. auth 값, email, password 값을 넣어서 요청을 보내면 간단하게 회원가입을 진행할 수 있다. 이 때 사용되는 Auth 값은 "firebase/auth" 에서 제공하는 getAuth() 메서드를 통해 가져오게 된다.
import { StyleSheet, Text, TextInput, TouchableOpacity, View } from 'react-native'
import React, { useState } from 'react'
import ListIcon from "../assets/list.svg"
import { getAuth, createUserWithEmailAndPassword } from 'firebase/auth';

const LoginScreen = () => {
  const [email, setEmail] = useState("");
  const [password, setPassword] = useState("");
  const auth = getAuth();
  const handleLogin = async() => {

  }

  const handleSignUp = async() => {
    try {
    const user = await createUserWithEmailAndPassword(auth, email, password);
    console.log("user", user);
    } catch (error) {
        console.log(error.message);
    }
  }

  return (
    <View style={styles.container}>
      <ListIcon />
      <View style={styles.inputContainer}>
        <TextInput
            placeholder="e-mail"
            placeholderTextColor={"grey"}
            value={email}
            onChangeText={text => setEmail(text)}
            style={styles.input}
        />
        <TextInput
            placeholder='password'
            placeholderTextColor={"grey"}
            value={password}
            onChangeText={text => setPassword(text)}
            style={styles.input}
            secureTextEntry={true}
        />
      </View>
      <View style={styles.inputContainer}>
        <TouchableOpacity
            onPress={handleLogin}
            style={styles.button}

        >
            <Text style={styles.buttonText}>LOG IN</Text>
        </TouchableOpacity>
        <TouchableOpacity
            onPress={handleSignUp}
            style={[styles.button, styles.buttonOutline]}

        >
            <Text style={styles.buttonOutlineText}>SIGN IN</Text>
        </TouchableOpacity>
      </View>
    </View>
  )
}

export default LoginScreen

const styles = StyleSheet.create({
    container: {
        flex: 1,
        justifyContent: "center",
        alignItems: "center"
    },
    inputContainer: {
        width: "80%",
        marginTop: 15,
    },
    input: {
        backgroundColor: "white",
        paddingHorizontal: 15,
        paddingVertical: 10,
        borderRadius: 10,
        marginTop: 5,
    },
    buttonContainer: {
        width: "50%",
        justifyContent: "center",
        alignItems: "center",
        marginTop: 30
    },
    button: {
        backgroundColor: "black",
        width: "100%",
        padding: 15,
        borderRadius: 10,
        alignItems: "center",
    },
    buttonOutline: {
        backgroundColor: "white",
        marginTop: 5,
        borderColor: "black",
        borderWidth: 1
    },
    buttonText: {
        color: "white",
        fontWeight: 500,
        fontSize: 16
    },
    buttonOutlineText: {
        color: "black",
        fontWeight: "500",
        fontSize: 16
    }
})
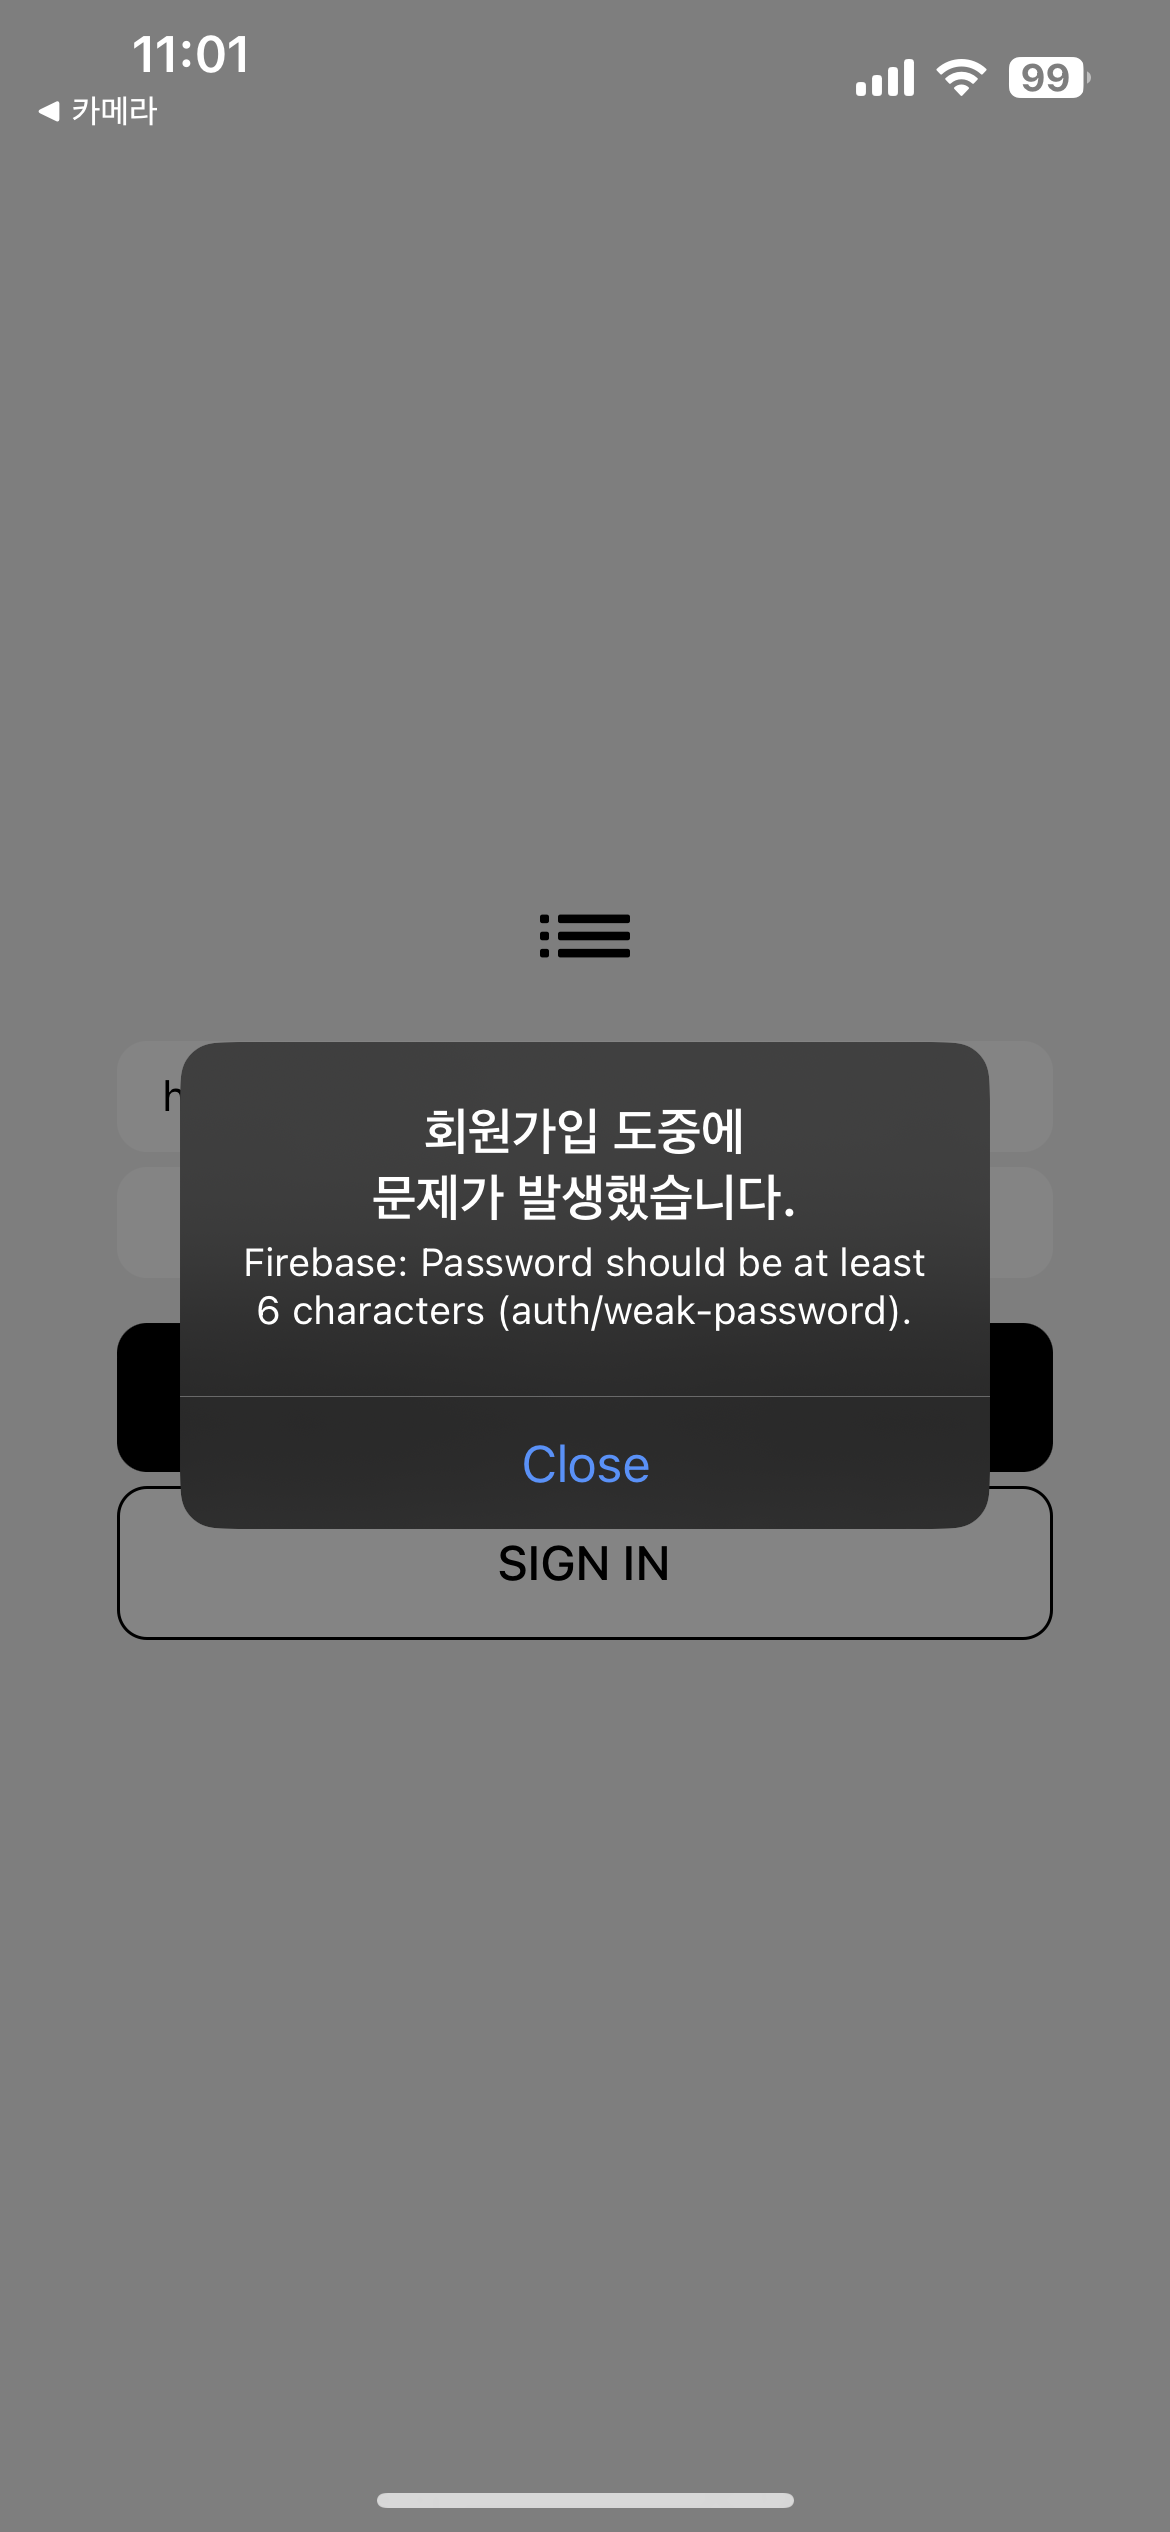
위와 같이 간단하게 작성해준 뒤, 코드를 실행시켜 회원가입을 진행해보면 아래와 같은 에러 메시지를 확인할 수 있다.

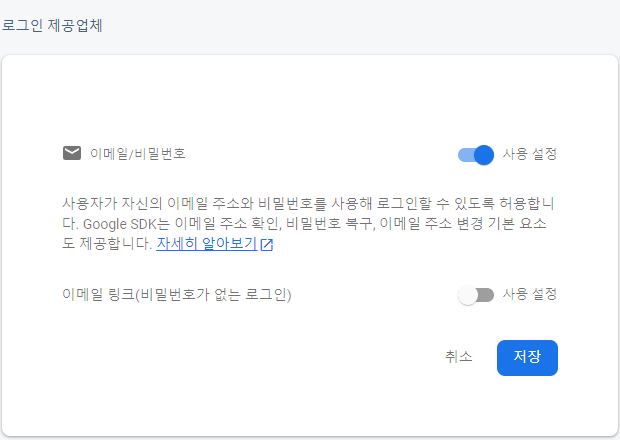
이를 해결하기 위해서는, firebase 홈페이지로 들어가서 Auth 기능을 사용할 수 있게끔 설정해줘야 한다. 프로젝트의 Authentication 란에 들어가서, 시작하기를 클릭한 후 email 과 password 사용 설정을 해주면 된다.
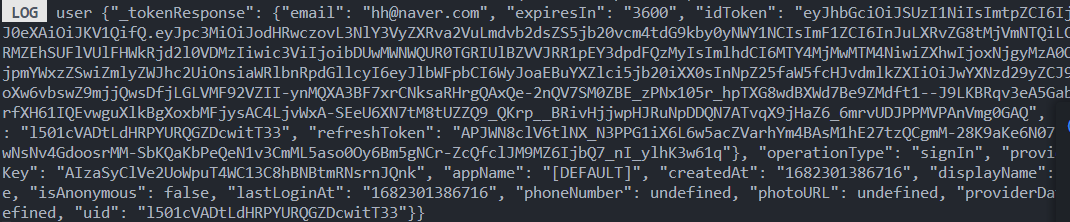
그 다음 다시 회원가입을 진행해보면, 잘 되는 것을 확인할 수 있다.
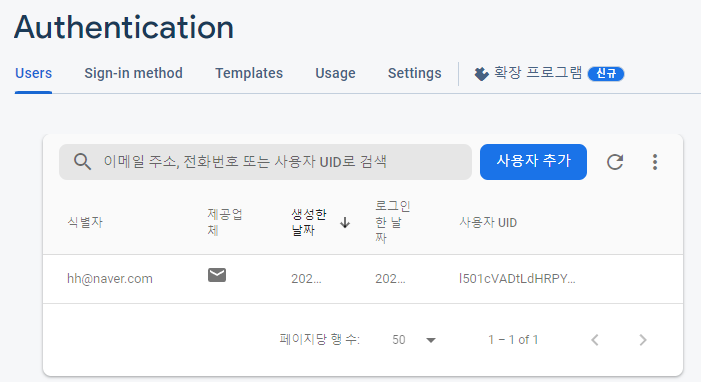
회원 유저들을 firebase 홈페이지에서 확인해볼 수 있다고 한다.
그 다음으로는 회원가입 성공/실패를 Toase/Alert 를 통해 사용자에게 알려주는 기능을 추가해주었다. Alert 는 기본적으로 제공되지만, Toast 기능은 기본적으로는 Android 플랫폼에서만 제공하기에 우선 react-native-toast-message 라는 모듈을 설치해주었다.
npm install --save react-native-toast-message
그리고, Toast 를 사용해주기 위해서는 App.js 에 아래와 같이 Toast 컴포넌트를 추가해주어야 한다.
export default function App() {
  return (
    <>
    <Provider store={store}>
      <NavigationContainer>
        <Stack.Navigator>
          {/* <Stack.Screen options={{headerShown:false}} name="Main" component={MainScreen}/> */}
          <Stack.Screen options={{headerShown:false}} name="Login" component={LoginScreen} />
        </Stack.Navigator>
      </NavigationContainer>
    </Provider>
    <Toast/>
    </>
  );
}
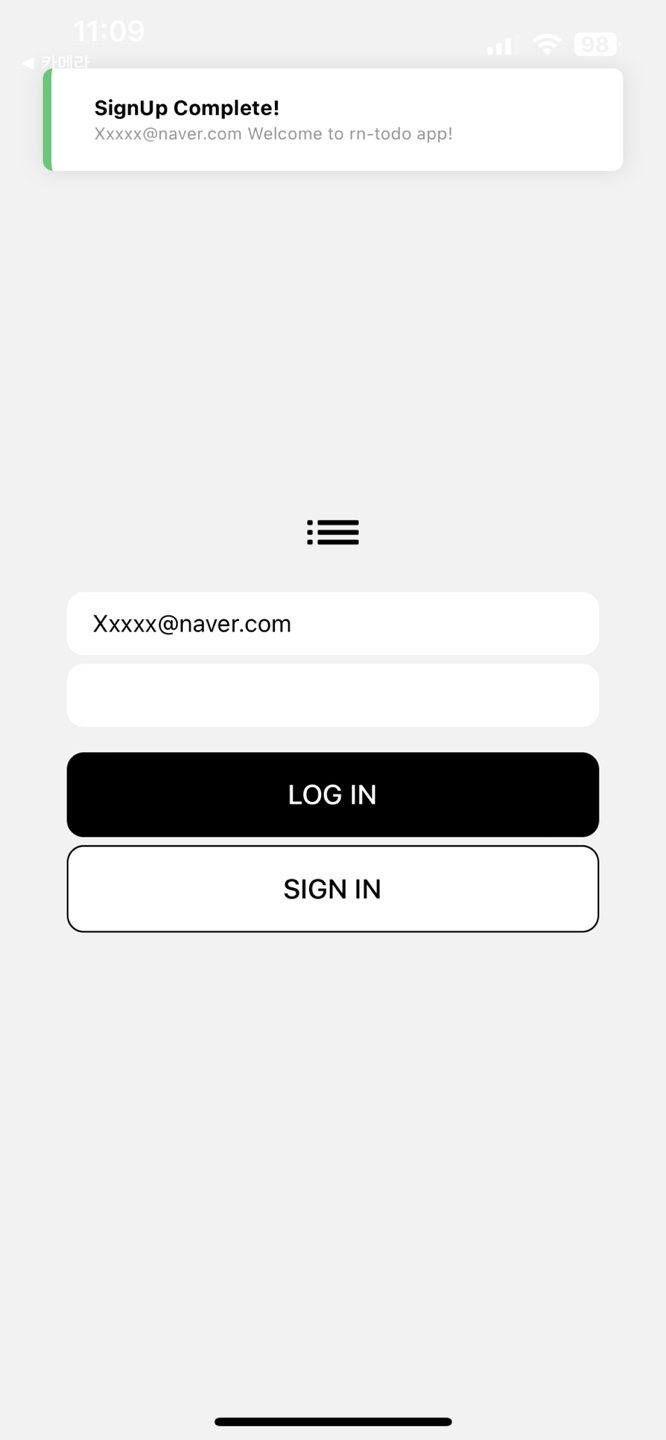
LoginScreen.js 에서 handleSignUp 메서드는 아래와 같이 작성되었다.
const handleSignUp = async() => {
try {
const user = await createUserWithEmailAndPassword(auth, email, password);
Toast.show({
    type: "success",
    text1: "SignUp Complete!",
    text2: `${email} Welcome to rn-todo app!`
})
} catch (error) {
    Alert.alert(
        "회원가입 도중에 문제가 발생했습니다.",
        error.message,
        [{text: "Close", onPress: () => console.log("Close")}],
        {cancelable: true}
    )
}
}
그 다음으로는 로그인 기능을 구현해보았다. 로그인을 진행할 때는 signInWithEmailAndPassword 메서드를 동일한 방식으로 사용하면 된다. 하지만, 그 외에 useEffect 도 새롭게 사용되었다. 로그인에 성공하였을 때 navigation 을 이용하여 Main 화면으로 이동할 수 있도록 하였다.
import { Alert, StyleSheet, Text, TextInput, TouchableOpacity, View } from 'react-native'
import React, { useEffect, useState } from 'react'
import ListIcon from "../assets/list.svg"
import { getAuth, createUserWithEmailAndPassword, signInWithEmailAndPassword, onAuthStateChanged } from 'firebase/auth';
import { Toast } from 'react-native-toast-message/lib/src/Toast';
import { useNavigation } from '@react-navigation/native';

const LoginScreen = () => {
  const [email, setEmail] = useState("");
  const [password, setPassword] = useState("");
  const navigation = useNavigation();
  const auth = getAuth();

  useEffect(() => {
    onAuthStateChanged(auth, user => {
        console.log("OnAuthStateChanged", user)
        if (user) {
            navigation.replace("Main")
        }
    })
  }, [])

  const handleLogin = async() => {
    try {
        const user = await signInWithEmailAndPassword(auth, email, password);
        Toast.show({
            type: "success",
            text1: `Hello!`
        })
        console.log(user)
    } catch (error) {
        Alert.alert(
            "Failed to Login",
            error.message,
            [{text: "Close", onPress:() => console.log("Close")}],
            {cancelable: true}
        )
    }
  }

  const handleSignUp = async() => {
    try {
    const user = await createUserWithEmailAndPassword(auth, email, password);
    Toast.show({
        type: "success",
        text1: "SignUp Complete!",
        text2: `${email} Welcome to rn-todo app!`
    })
    } catch (error) {
        Alert.alert(
            "회원가입 도중에 문제가 발생했습니다.",
            error.message,
            [{text: "Close", onPress: () => console.log("Close")}],
            {cancelable: true}
        )
    }
  }

  return (
    <View style={styles.container}>
      <ListIcon />
      <View style={styles.inputContainer}>
        <TextInput
            placeholder="e-mail"
            placeholderTextColor={"grey"}
            value={email}
            onChangeText={text => setEmail(text)}
            style={styles.input}
        />
        <TextInput
            placeholder='password'
            placeholderTextColor={"grey"}
            value={password}
            onChangeText={text => setPassword(text)}
            style={styles.input}
            secureTextEntry={true}
        />
      </View>
      <View style={styles.inputContainer}>
        <TouchableOpacity
            onPress={handleLogin}
            style={styles.button}
        >
            <Text style={styles.buttonText}>LOG IN</Text>
        </TouchableOpacity>
        <TouchableOpacity
            onPress={handleSignUp}
            style={[styles.button, styles.buttonOutline]}
        >
            <Text style={styles.buttonOutlineText}>SIGN IN</Text>
        </TouchableOpacity>
      </View>
    </View>
  )
}

export default LoginScreen

const styles = StyleSheet.create({
    container: {
        flex: 1,
        justifyContent: "center",
        alignItems: "center"
    },
    inputContainer: {
        width: "80%",
        marginTop: 15,
    },
    input: {
        backgroundColor: "white",
        paddingHorizontal: 15,
        paddingVertical: 10,
        borderRadius: 10,
        marginTop: 5,
    },
    buttonContainer: {
        width: "50%",
        justifyContent: "center",
        alignItems: "center",
        marginTop: 30
    },
    button: {
        backgroundColor: "black",
        width: "100%",
        padding: 15,
        borderRadius: 10,
        alignItems: "center",
    },
    buttonOutline: {
        backgroundColor: "white",
        marginTop: 5,
        borderColor: "black",
        borderWidth: 1
    },
    buttonText: {
        color: "white",
        fontWeight: 500,
        fontSize: 16
    },
    buttonOutlineText: {
        color: "black",
        fontWeight: "500",
        fontSize: 16
    }
})
마지막으로 로그아웃 기능을 구현하였다. 이 때는 "firebase/auth" 의 signOut 메서드가 사용된다. 그 외는 거의 동일하다.
import { View, Text, SafeAreaView, Platform, FlatList, TouchableOpacity, Alert } from 'react-native'
import React from 'react'
import { StyleSheet } from 'react-native'
import { StatusBar } from 'expo-status-bar'
import InputForm from '../components/InputForm'
import TodoItem from '../components/TodoItem'
import { useSelector } from 'react-redux'
import { getAuth, signOut } from 'firebase/auth'
import { useNavigation } from '@react-navigation/native'

const MainScreen = () => {
  const todos = useSelector(state => state.todo.todos);

  const todoTasks = todos.filter((item) => item.state === "todo");
  const completedTasks = todos.filter((item) => item.state === "done");
  const auth = getAuth();
  const navigation = useNavigation();
  const handleLogout = async() => {
    try {
      await signOut(auth)
      navigation.replace("Login");
    } catch (error) {
      Alert.alert(
        "Failed to Logout",
        error.message,
        [{text: "Close", onPress:() => console.log("Close")}],
        {cancelable: true}
      )
    }

  }
  return (
    <SafeAreaView style={styles.container}>
      <StatusBar
      barStyle={"default"}
      />
      <View style={styles.headerContainer}>
        <Text style={styles.pageTitle}>ToDo App</Text>
        <TouchableOpacity
          style={styles.logoutButton}
          onPress={handleLogout}
        >
          <Text style={styles.logoutText}>Logout</Text>
        </TouchableOpacity>
      </View>
      <View style={styles.listView}>
        <Text style={styles.listTitle}>TO DO</Text>
        {todoTasks.length !== 0 ? (
          <FlatList
            data={todoTasks}
            renderItem={({item}) => <TodoItem {...item} />}
            keyExtractor={(item) => item.id}
          ></FlatList>
        ) : (<Text style={styles.emptyListText}>NOTHING TO DO!</Text>)}
      </View>
      <View style={styles.separator}/>
      <View style={styles.listView}>
        <Text style={styles.listTitle}>DONE</Text>
        {completedTasks.length !== 0 ? (
          <FlatList
            data={completedTasks}
            renderItem={({item}) => <TodoItem {...item} />}
            keyExtractor={(item) => item.id}
          ></FlatList>
        ) : (<Text style={styles.emptyListText}>NOTHING DONE YET</Text>)}
      </View>
      <InputForm/>
    </SafeAreaView>
  )
}

export default MainScreen

const styles = StyleSheet.create({
  container: {
    flex: 1,
    paddingTop: Platform.OS === 'android' ? 20 : 0, // ANDROID 와 IOS 의 분기처리 (이유: IOS 에서는 이미 SafeAreaView 를 사용했기 때문)
    backgroundColor: "#f7f8fa"
  },
  pageTitle: {
    marginBottom: 35,
    paddingHorizontal: 15,
    fontSize: 50,
    fontWeight: "600"
  },
  separator: {
    marginHorizontal: 10,
    marginTop: 25,
    marginBottom: 10,
    borderBottomWidth: 1,
    borderBottomColor: "rgba(0,0,0,0.2)"
  },
  listView: {
    flex: 1,
  },
  listTitle: {
    marginBottom: 25,
    paddingHorizontal: 15,
    fontSize: 40,
    fontWeight: "500"
  },
  emptyListText: {
    paddingTop: 10,
    paddingBottom: 15,
    paddingHorizontal: 15,
    fontSize: 15,
    lineHeight: 20,
    color: "#737373"
  },
  headerContainer: {
    flexDirection: "row",
    alignItems: "center",
    justifyContent: "space-between",
  },
  logoutText: {
    color: "white",
    fontSize: 10,
  },
  logoutButton: {
    marginBottom: 25,
    marginRight: 20,
    justifyContent: "center",
    alignItems: "center",
    width: 50,
    height: 30,
    backgroundColor: "rgba(0,0,0,0.7)",
    borderRadius: 4
  }
})
여기까지 작성하면 잘 되는 것을 확인할 수 있다.
Reference:
'Frontend > React Native' 카테고리의 다른 글
| RN E-Commerce App Clone: Animated, Moti (0) | 2023.06.26 |
|---|---|
| React Native 로 To-Do App 만들기 (3) (0) | 2023.04.23 |
| React Native 로 To-Do App 만들기 (2) (0) | 2023.03.26 |
| React Native: Redux (2) (0) | 2023.03.25 |
| React Native: Redux (0) | 2023.03.24 |


