
elevne's Study Note
React Native: Redux (2) 본문
이어서 Redux 에 대해서 알아보았다. 우선 Redux 미들웨어에 대하여 알아보았다. Redux 미들웨어는 액션을 dispatch 전달하고 리듀서에 도달하는 순간 사이에 사전에 지정된 작업을 실행할 수 있게 해주는 중간자라고 한다. Logging, 충돌 보고, 비동기 API 통신, 라우팅 등을 위해 Redux 미들웨어를 사용한다고 한다. 우선 실습으로, 간단한 로깅 미들웨어를 생성해보았다.
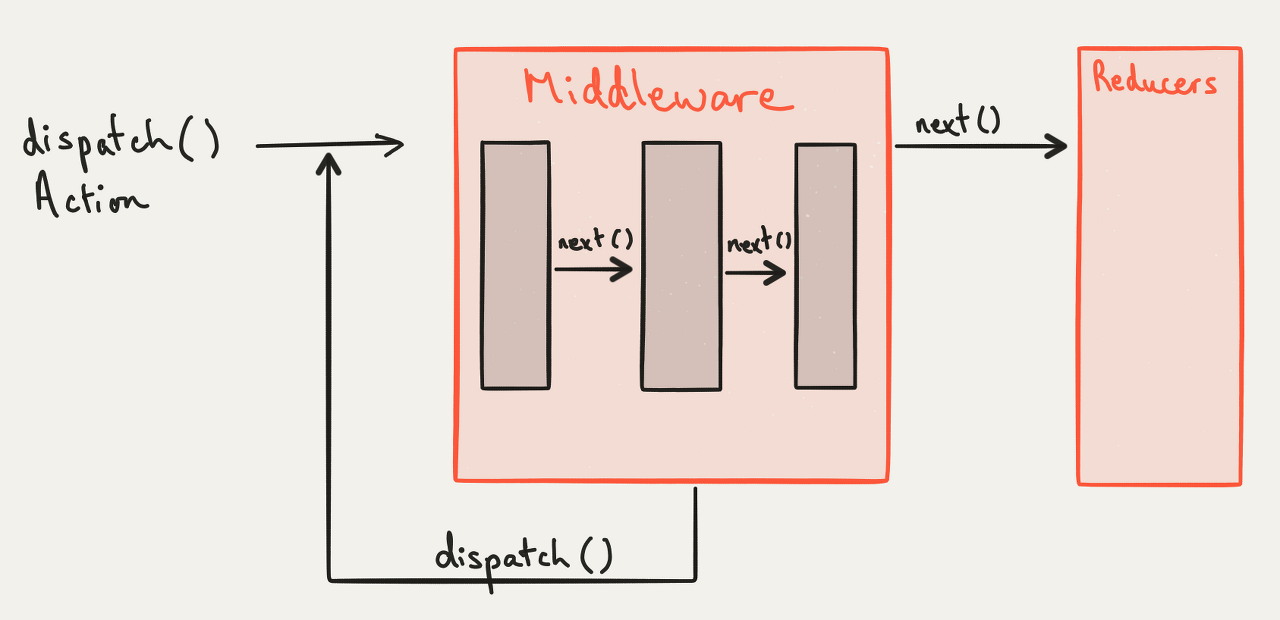
우선 아래와 같은 코드를 Index.tsx 파일에 추가해준다. Counter 기능에서 +/- 버튼을 누를 때마다 로그가 찍히게되는 것을 확인해볼 수 있다. 아래를 보면 Middleware 을 추가해주는 것은 함수를 return 하는 함수를 return 하는 함수를 만들어서, 이를 applyMiddleware 메서드에 넣어준 후, createStore 에 rootReducer 과 같이 넣어주어 사용하면 된다는 것을 알 수 있다.
const loggerMiddleware = (store: any) => (next: any) => (action: any) => {
  console.log("store", store);
  console.log("action", action);
  next(action);
};
const middelware = applyMiddleware(loggerMiddleware);
const store = createStore(rootReducer, middelware);
그 다음으로는 Redux Thunk 라는 것에 대해 알아보았다. Redux Thunk 는 Redux 를 사용하는 앱에서 비동기 작업을 할 때 가장 많이 사용되는 방법이라고 한다. 이 또한 Redux middleware 의 일종이다. 여기서 Thunk 란 일부 지연된 작업을 수행하는 코드 조각을 의미하는 프로그래밍 용어이다. 지금 일부 로직을 실행하는 것이 아니라, 나중에 작업을 수행하는 데 사용할 수 있는 본문이나 코드를 작성할 수 있다고 한다. ( 함수 등으로 변수를 추후에 생성하는 것이 하나의 예이다 )
비동기 작업은 주로 서버에 요청을 보내서 데이터를 가져올 때 진행된다. 우선 서버에 요청을 보내기 위해 axios 모듈을 설치한다.
npm install axios --save
그 다음으로는, 요청을 보내서 Todo 목록들을 받아올 수 있게끔하는 posts 리듀서를 작성해보았다. 아래 코드들은 각각 posts.tsx, index.tsx 이다.
enum ActionType {
    FETCH_POSTS = "FETCH_POSTS",
    DELETE_POSTS = "DELETE_POSTS"
}

interface Post {
    userId: number;
    id: number;
    title: string;
}

interface Action {
    type: ActionType;
    payload: Post[];
}

const posts = (state=[], action: Action) => {
    switch (action.type) {
        case "FETCH_POSTS":
            return [...state, ...action.payload];
        default:
            return state;
    }
}

export default posts;
import { combineReducers } from 'redux';
import counter from "./counter"
import todos from "./todos"
import posts from "./posts"

const rootReducer = combineReducers({
    counter,
    todos,
    posts
})

export default rootReducer;

export type RootState = ReturnType<typeof rootReducer>;
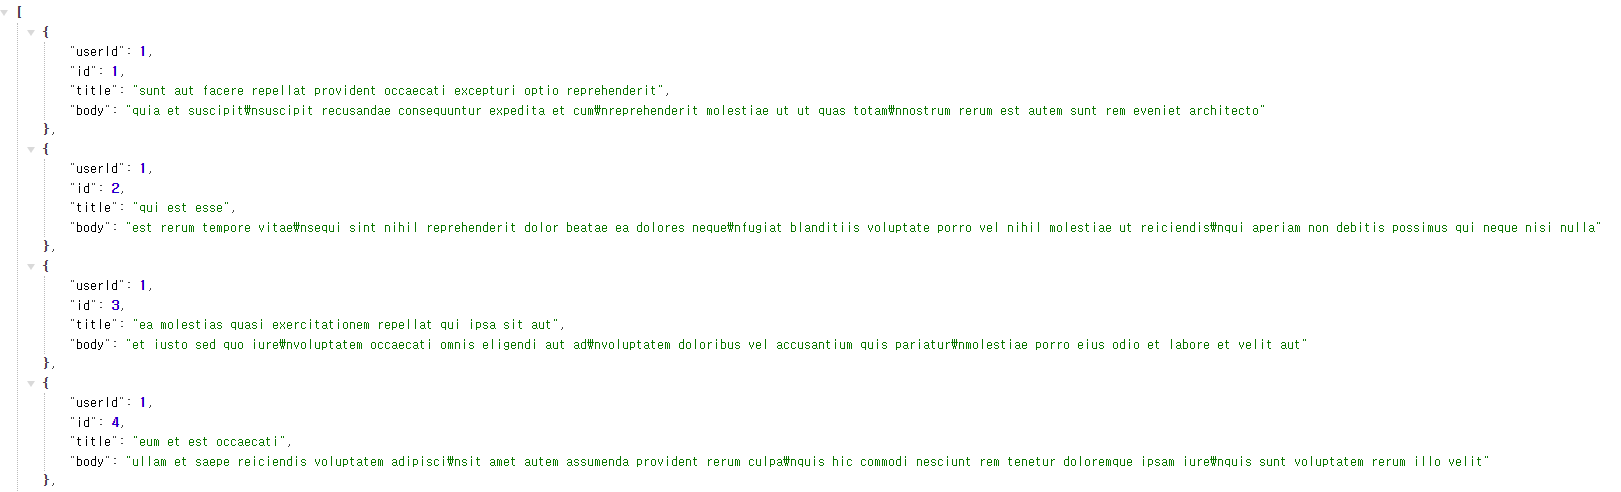
요청을 보낼 주소는 아래 링크이다. 링크에 접속해보면 json 형태로 posts 의 목록을 반환하는 것을 확인할 수 있다.
링크: https://jsonplaceholder.typicode.com/posts
App.tsx 에 아래와 같은 코드를 추가해준다.
  useEffect(() => {
    dispatch(fetchPosts());
  }, [dispatch])

  const fetchPosts = ():any => {
    return async function fetchPostsThunk(dispatch: any, getState: any) {
      const response = await axios.get("https://jsonplaceholder.typicode.com/posts");
      dispatch({type:"FETCH_POSTS", payload:response.data})
    }
  }
위에서 사용된 useEffect 는 컴포넌트가 렌더링될 때마다 특정 작업을 수행할 수 있도록 하는 메서드이다. 그래서 컴포넌트가 렌더링될 때마다 dispatch 가 수행될 수 있도록 하는 것이다. dispatch 에는 본래 Action 객체가 들어가야 하는데 위에서는 함수가 들어가서 오류가 나게 된다. 함수를 dispatch 할 수 있게 해주는 Redux-Thunk 미들웨어를 설치해서 사용해야 한다.
npm install redux-thunk --save
위와 같이 설치해준 후, index.tsx 에서 applyMiddleware 에 아래와 같이 thunk 를 파라미터로 추가해주면 된다. thunk 를 추가해주게 되면, dispatch 에 함수가 아닌 객체가 올 때는 바로 reducer 로 가게되고 함수라면 dispatch, getState 를 argument 로 한 함수를 호출하게 되는 로직을 사용한다. 이 함수를 호출한 후에, 다시 dispatch 를 함수 내에서 호출하여 reducer 로 보내는 것이다.
const middelware = applyMiddleware(thunk, loggerMiddleware);
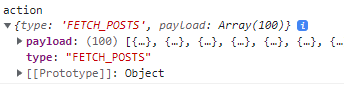
FETCH_POST 를 통해 잘 가져오는 것을 확인할 수 있다.
import React, { useEffect, useState } from 'react';
import logo from './logo.svg';
import './App.css';
import { useSelector } from 'react-redux/es/exports';
import { RootState } from './reducers';
import { useDispatch } from 'react-redux/es/hooks/useDispatch';
import axios from 'axios';

interface Post {
  userId: number;
  id: number;
  title: string;
}

type Props = {
  value: any;
  onIncrement: ()=>void;
  onDecrement: ()=>void;
}

function App({value, onIncrement, onDecrement}:Props) {

  const counter = useSelector((state: RootState) => state.counter)
  const todos: string[] = useSelector((state: RootState) => state.todos)
  const posts: Post[] = useSelector((state: RootState) => state.posts)
  const dispatch = useDispatch();

  const [todoValue, setTodoValue] = useState("");
  const handleChange = (e:React.ChangeEvent<HTMLInputElement>) => {
    setTodoValue(e.target.value);
  }
  const addTodo = (e: React.FormEvent<HTMLFormElement>) => {
    e.preventDefault();
    dispatch({type:"ADD_TODO", text: todoValue})
    setTodoValue("");
  }

  useEffect(() => {
    dispatch(fetchPosts());
  }, [dispatch])

  const fetchPosts = (): any => {
    return async function fetchPostsThunk(dispatch: any, getState: any) {
      const response = await axios.get("https://jsonplaceholder.typicode.com/posts");
      dispatch({type:"FETCH_POSTS", payload: response.data})
    }
  }

  return (
    <div className="App">
      Clicked: {counter} times
      <button onClick={onIncrement}>
        +
      </button>
      <button onClick={onDecrement}>
        -
      </button>

      <form onSubmit={addTodo}>
        <input type="text" value={todoValue} onChange={handleChange} />
        <input type="submit" />
      </form>

      <ul>
        {todos.map((todo, index) => <li key={index}>{todo}</li>)}
      </ul>

      <ul>
        {posts.map((post, index) => <li key={index}>{post.title} , {post.userId}</li>)}
      </ul>

    </div>
  );
}

export default App;
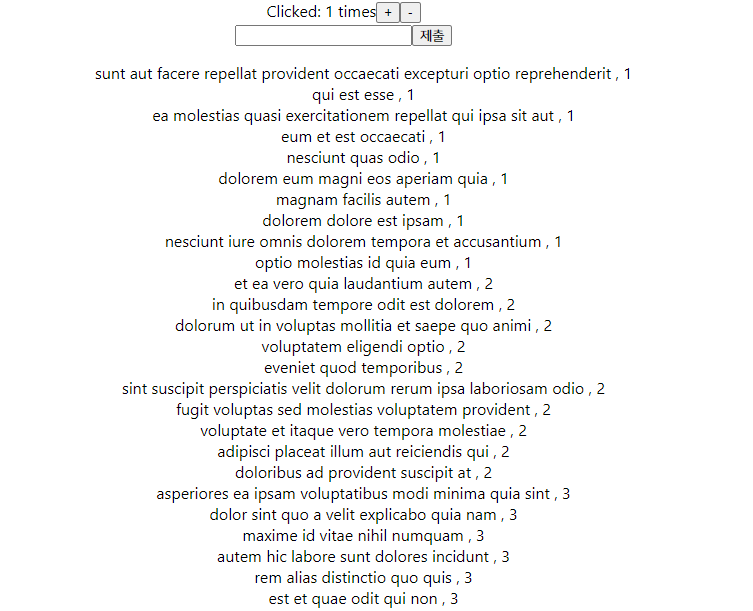
App.tsx 파일을 위와 같이 수정해준다. 위에서 추가한 부분은 posts 와 관련된 부분들이다. 화면에 결과가 잘 조회되는 것을 확인할 수 있다.
일반적으로 fetchPosts 와 같은 함수들은 컴포넌트 내에서 작성하지 않고, 따로 src 폴더 내에 action 이라는 폴더를 만들어 그 안에서 작성한다고 한다.
또, fetchPosts 함수를 아래처럼 조금 더 모던한 문법으로 변경해볼 수 있다.
export const fetchPosts2 = (): any => async(dispatch: any, getState: any) => {
    const response = await axios.get("https://jsonplaceholder.typicode.com/posts");
    dispatch({type: "FETCH_POSTS", payload: response.data})
}
App.tsx
  useEffect(() => {
    dispatch(fetchPosts2());
  }, [dispatch])
위와 같이 Redux Thunk 를 사용하여 액션 생성자가 그저 하나의 액션 객체를 생성할 뿐만 아니라 그 내부에서 여러 작업을 수행할 수 있게끔 한다.
그 다음으로는 마지막으로 Redux Toolkit 에 대해 알아보았다. Redux 툴킷은 Redux 로직을 작성하기 위한 공식 권장 접근 방식이다. Redux 코어를 둘러싸고 있으며 Redux 앱을 빌드하는데 필수적인 패키지, 기능이 있다. Redux toolkit 은 제안된 모범 사례를 기반으로 하여 대부분의 Redux 작업을 단순화하고 일반적인 실수를 방지할 수 있게끔 한다고 한다. 우선 아래 명령어를 통해 설치를 진행해준다.
npm install @reduxjs/toolkit react-redux
또한, 아래 링크에서 Redux toolkit 을 이용하여 Counter 앱을 만든 소스를 확인해볼 수 있다.
링크: https://github.com/reduxjs/cra-template-redux
GitHub - reduxjs/cra-template-redux: The official Redux template for Create React App
The official Redux template for Create React App. Contribute to reduxjs/cra-template-redux development by creating an account on GitHub.
github.com
위 링크에 들어가게 되면, Redux toolkit 템플릿을 바로 적용하여 React project 를 만들 수 있는 명령어를 확인할 수 있다. 아래와 같다.
npx create-react-app redux-toolkit-counter --template redux-typescript
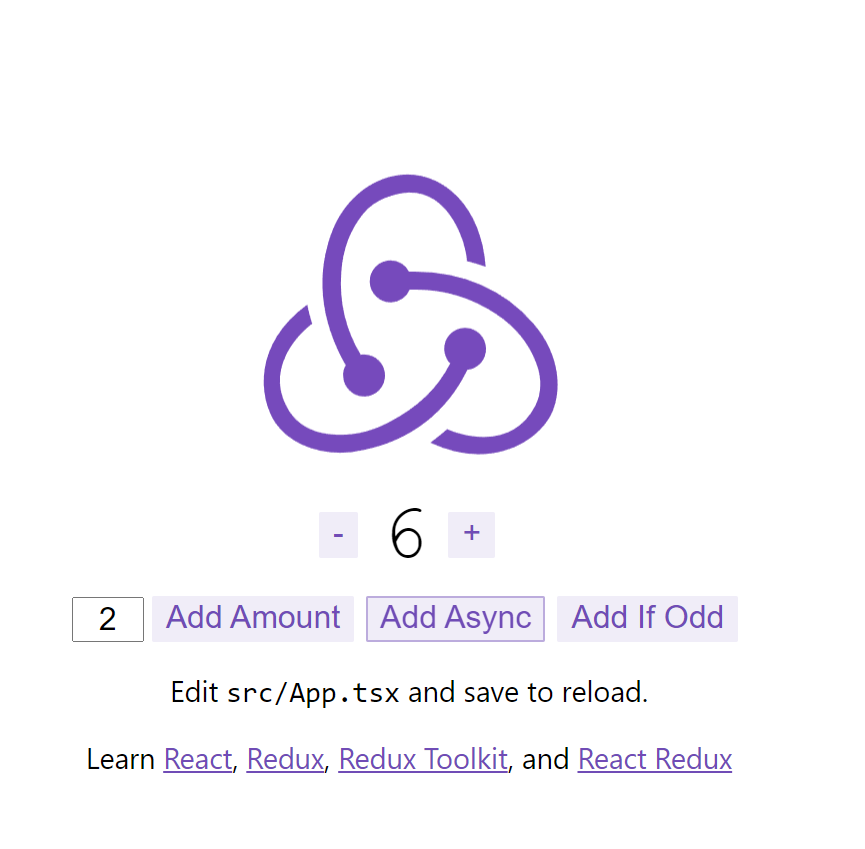
프로젝트를 생성한 후, npm start 를 해보면 아래와 같은 Counter 앱을 확인할 수 있다.
프로젝트를 구조를 살펴보았다. 우선 Store 은 redux toolkit 에서 제공하는 configureStore 이라는 메서드를 통해서 생성된다. app 폴더 밑의 app.ts 파일을 보면 아래와 같은 코드가 적혀있다.
import { configureStore, ThunkAction, Action } from '@reduxjs/toolkit';
import counterReducer from '../features/counter/counterSlice';

export const store = configureStore({
  reducer: {
    counter: counterReducer,
  },
});

export type AppDispatch = typeof store.dispatch;
export type RootState = ReturnType<typeof store.getState>;
export type AppThunk<ReturnType = void> = ThunkAction<
  ReturnType,
  RootState,
  unknown,
  Action<string>
>;
store.ts 에서 store 을 만들어준 것을, index.tsx 에서 이전과 동일하게 <Provider store={store}> 안에 넣어준 것을 확인할 수 있다.
그 다음으로는 slice 라는 것을 만들어준다.
import { createAsyncThunk, createSlice, PayloadAction } from '@reduxjs/toolkit';
import { RootState, AppThunk } from '../../app/store';
import { fetchCount } from './counterAPI';

export interface CounterState {
  value: number;
  status: 'idle' | 'loading' | 'failed';
}

const initialState: CounterState = {
  value: 0,
  status: 'idle',
};

// The function below is called a thunk and allows us to perform async logic. It
// can be dispatched like a regular action: `dispatch(incrementAsync(10))`. This
// will call the thunk with the `dispatch` function as the first argument. Async
// code can then be executed and other actions can be dispatched. Thunks are
// typically used to make async requests.
export const incrementAsync = createAsyncThunk(
  'counter/fetchCount',
  async (amount: number) => {
    const response = await fetchCount(amount);
    // The value we return becomes the `fulfilled` action payload
    return response.data;
  }
);

export const counterSlice = createSlice({
  name: 'counter',
  initialState,
  // The `reducers` field lets us define reducers and generate associated actions
  reducers: {
    increment: (state) => {
      // Redux Toolkit allows us to write "mutating" logic in reducers. It
      // doesn't actually mutate the state because it uses the Immer library,
      // which detects changes to a "draft state" and produces a brand new
      // immutable state based off those changes
      state.value += 1;
    },
    decrement: (state) => {
      state.value -= 1;
    },
    // Use the PayloadAction type to declare the contents of `action.payload`
    incrementByAmount: (state, action: PayloadAction<number>) => {
      state.value += action.payload;
    },
  },
  // The `extraReducers` field lets the slice handle actions defined elsewhere,
  // including actions generated by createAsyncThunk or in other slices.
  extraReducers: (builder) => {
    builder
      .addCase(incrementAsync.pending, (state) => {
        state.status = 'loading';
      })
      .addCase(incrementAsync.fulfilled, (state, action) => {
        state.status = 'idle';
        state.value += action.payload;
      })
      .addCase(incrementAsync.rejected, (state) => {
        state.status = 'failed';
      });
  },
});

export const { increment, decrement, incrementByAmount } = counterSlice.actions;

// The function below is called a selector and allows us to select a value from
// the state. Selectors can also be defined inline where they're used instead of
// in the slice file. For example: `useSelector((state: RootState) => state.counter.value)`
export const selectCount = (state: RootState) => state.counter.value;

// We can also write thunks by hand, which may contain both sync and async logic.
// Here's an example of conditionally dispatching actions based on current state.
export const incrementIfOdd =
  (amount: number): AppThunk =>
  (dispatch, getState) => {
    const currentValue = selectCount(getState());
    if (currentValue % 2 === 1) {
      dispatch(incrementByAmount(amount));
    }
  };

export default counterSlice.reducer;
createSlice 메서드로 만들어주게 된다. Slice 에는 name, initialState 등을 지정해주고 Reducer 에 관한 것들도 정의해주게 된다. 이러한 slice 를 Store 에 추가해주면 되는 것이다. (위 코드에 적용되어 있다.) 마지막으로 컴포넌트 내에서는 이전과 마찬가지로 useDispatch, useSelector hooks 를 사용하여 Redux 를 적용하게 되는 것이다. 소스에는 app/hooks.ts 에 따로 함수를 정의해두었다.
import { TypedUseSelectorHook, useDispatch, useSelector } from 'react-redux';
import type { RootState, AppDispatch } from './store';

// Use throughout your app instead of plain `useDispatch` and `useSelector`
export const useAppDispatch = () => useDispatch<AppDispatch>();
export const useAppSelector: TypedUseSelectorHook<RootState> = useSelector;
Reference:
'Frontend > React Native' 카테고리의 다른 글
| React Native 로 To-Do App 만들기 (3) (0) | 2023.04.23 |
|---|---|
| React Native 로 To-Do App 만들기 (2) (0) | 2023.03.26 |
| React Native: Redux (0) | 2023.03.24 |
| React Native 로 To-Do App 만들기 (1) (0) | 2023.03.23 |
| Expo 정리 (0) | 2023.03.08 |


